By default your camera records images to your memory card as a jpeg. A jpeg is a standard file type that can be viewed on all sorts of devices from iPhones to PCs. They are ready to use straight out of the camera.
You can choose the quality of the jpeg and select between small, medium or large. This alters the dimensions of the jpeg. You can also change the quality of the jpeg to be low quality and high quality; this alters the resolution of the jpeg. Most of the time high quality and large jpegs should be selected.
Jpegs are super convenient.
They are ready to go straight out of the camera and can be uploaded to Facebook, emailed or printed without the need for any messing around on your computer.
Jpegs are less flexible.
The downside is that, although you can make some small changes to your photos on your computer, the final look of the photo is pretty much fixed by your camera. They don’t give you a huge amount of flexibility if you want to correct or edit your photos.
Raw files are basically data.
Your camera collects as much data as possible from the scene and shows you a version of it on the back of your camera.
Raw files needs to be processed after you take them. Most computers can handle this, but you can’t upload a raw file directly to Facebook for example, it must be converted to a jpeg first.
Each camera manufacturer has its own raw format.
Raw files are very flexible for editing.
The advantage of raw files is that they allow much more flexibility for editing. You can, for example, easily change the white balance to anything you want, and you can bring back detail in over exposed or underexposed areas of your image. The downside is that they take up a lot more space on your memory card due to the additional amount of data.
When the photo below was taken, the I mistakenly had the camera on the wrong settings and photo was overexposed. You can see that the ground is very bright.
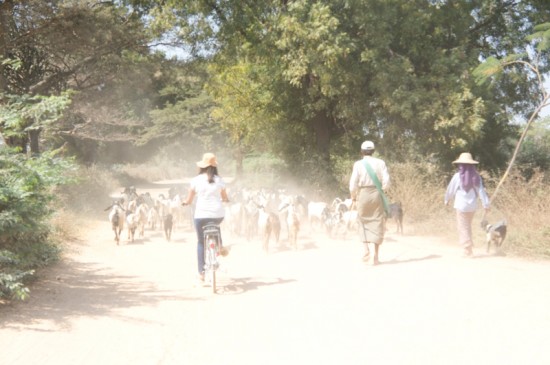
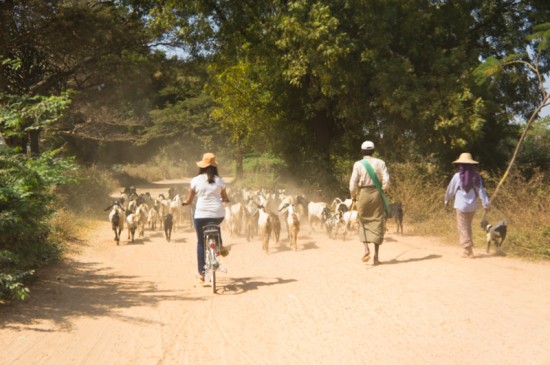
Luckily the photo was captured as a raw file. This means that when I edited the photo by reducing the exposure in Photoshop, I could then see detail in the sand that is not visible in the original photo. If I did the same thing to a jpeg the light areas would have become darker, but I would not have recovered the detail and texture in the sand I have here:
Here is table the shows all of the differences, there are lots, but what I wrote about in teh post above is the post practical info. This table if for reference:
| RAW | JPEG | |
|---|---|---|
| What it is | Unprocessed sensor data | Processed image created by the camera |
| File size | Large | Small |
| Image quality | Maximum | Reduced |
| Dynamic range | High | Limited |
| White balance | Fully adjustable | Mostly can’t be changed |
| Colour depth | Maximum posible | Lower |
| Editing flexibility | Very high | Limited |
| Noise handling | Needs to be done in editing | Already applied in camera |
| Sharpening | Needs to be done in editing | Applied in-camera |
| Speed / workflow | Slower, needs post-processing | Fast, better for rapid firing, ready to use |
| File size | large – Uses more card and disk space | Smaller |
| Best for | Control over editing | Quick delivery, high-volume shooting |
Summary – JPEG vs RAW
Both have their uses. Raws are best for maximum editing control and flexibility. Jpegs are great for quick work and most camera produce lovely in camera jpegs which mean you don’t need to both with editing.

Andrew Mason is a professional photographer and the founder of the 36exp Photographers School plus the London Photo Show.
He shoots mainly commercial portraits for a living, and likes to shoot landscape, portrait and travel photography.
He is a master of lighting and portrait photography, plus leads photography trips with 36exp.